Simple guide to implementing a place/address autocomplete input with Google APIs and React
Development
Location autocomplete inputs are everywhere, but they aren’t as trivial to implement as one would expect. Yes, there are tons of npm packages out there, but most of them are poorly maintained or not allowing enough customization. If you’re a developer working in a professional project, you’re better off building the logic yourself and leveraging your UI library of choice to style the input and the suggestions.
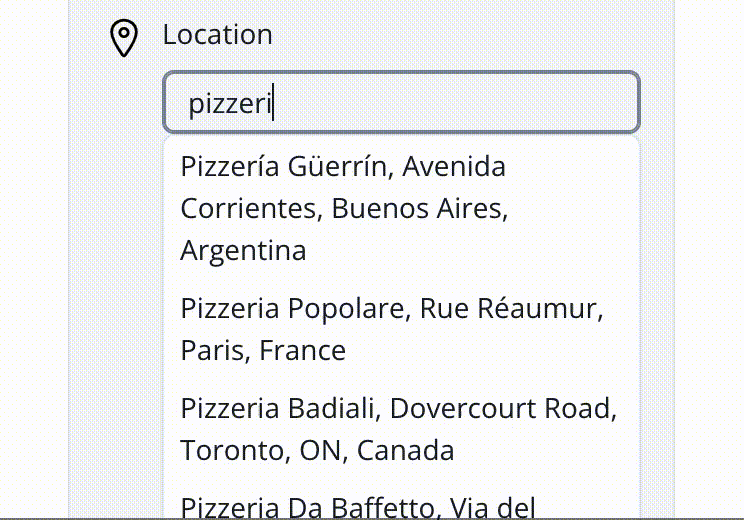
Google Cloud offers a ton of APIs, including ones that you can use for address autocompletion. Let’s set up a Google Cloud project and make a React component, step by step, to obtain something like this:
What Google APIs to use?
It isn’t straightforward, so let’s summarize it here:
The Google Maps JavaScript API needs to be enabled in order to make API requests from a browser.
The Google Places API is actually the one we need, using it for the Autocomplete Service and the Places Service.
The Autocomplete Service provides predictions for what the user is looking for based on an incomplete input, like “Pizzeria Lu” when trying to find Pizzeria Lugano. It doesn’t provide any details about the place, except its complete address and it’s Google Place ID.
The Places Service returns detailed information about a place.
The implementation performs the following:
When the user is typing, we use the Autocomplete Service to obtain suggestions.
When the user selects a suggestion, we use the Places Service to get the place detailed information, like address, coordinates, and many other possible fields.
Are there alternative APIs that offer this service?
Yes, for example, the Mapbox Address Autofill API.
Mapbox is one of my favorite products, and I always try to use it before resorting to Google. However, in recent projects, I needed to obtain the place’s time zone, and Mapbox doesn’t have an API to return this information. Google does, the Time Zone API, and so I prefer to use as few 3rd party APIs as possible in a project to keep things simple.
There’s also LocationIQ, which uses OpenStreetMap Nominatim. I haven’t used it yet, but it looks great. Thanks to Ryan Floyd for sharing this example!
Steps to implement a React input with location autocomplete
1. Create a Google Cloud project
If you haven’t already, create a Google Cloud project.
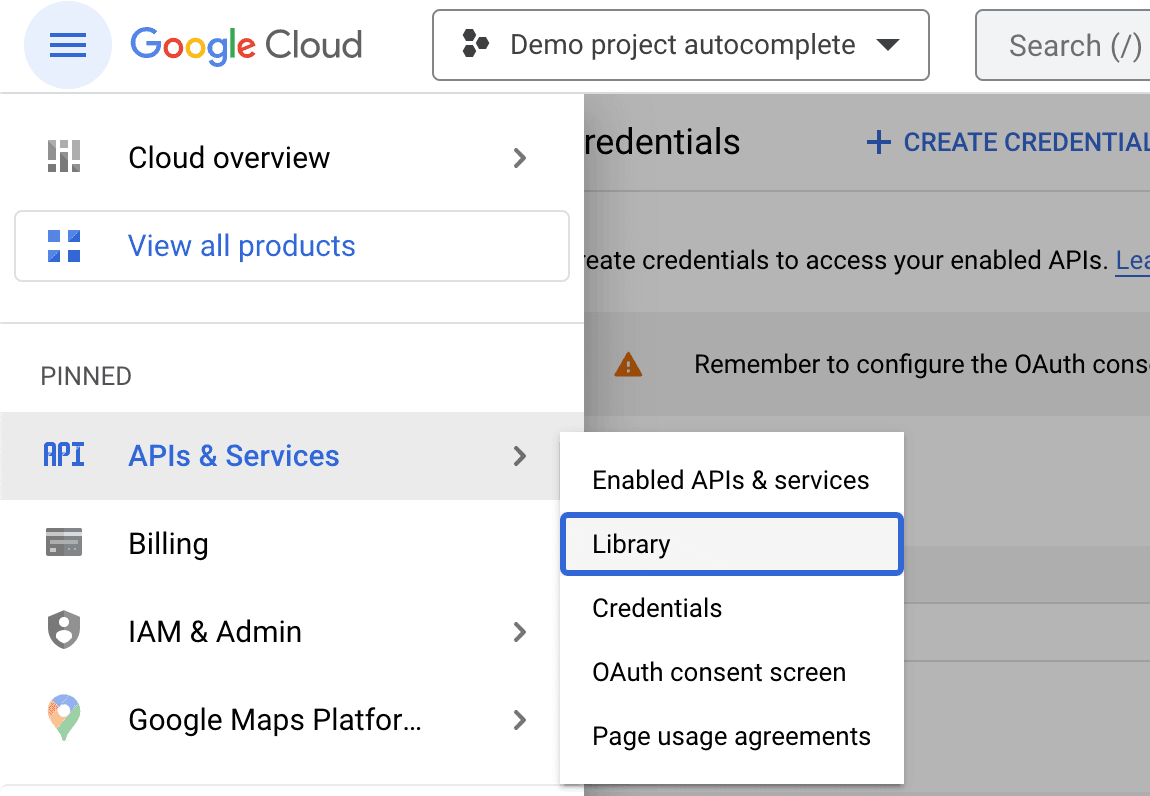
2. Enable the Maps JavaScript API and Places API
We only need those 2 APIs, so let’s be minimalistic and mitigate risks by enabling only those.
To do it in a way that it doesn’t enable all the other Google Maps APIs, go to APIs & Services > Library:
Then search for the Maps JavaScript API:
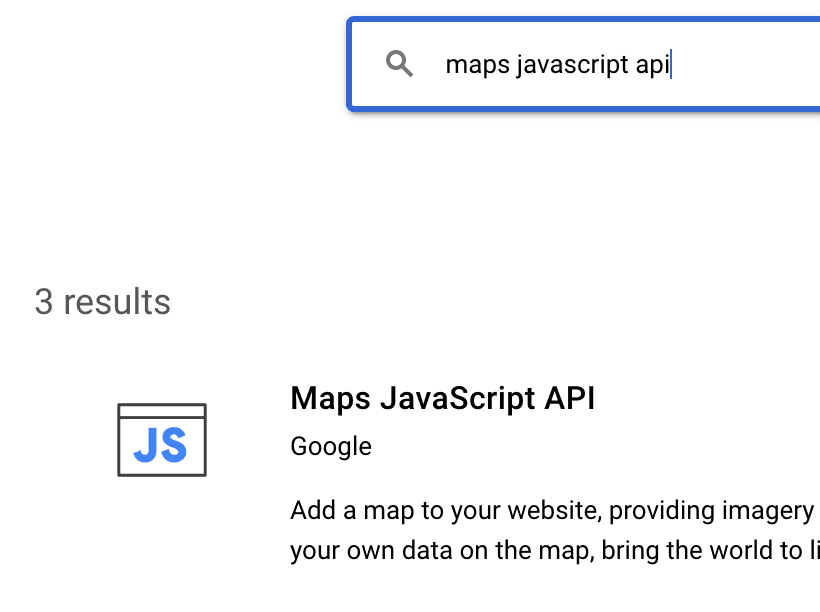
Select it, and then click “Enable”.
It’ll prompt you to create a billing profile if you haven’t already. The Maps APIs require having billing configured.
Then repeat the process for the Places API.
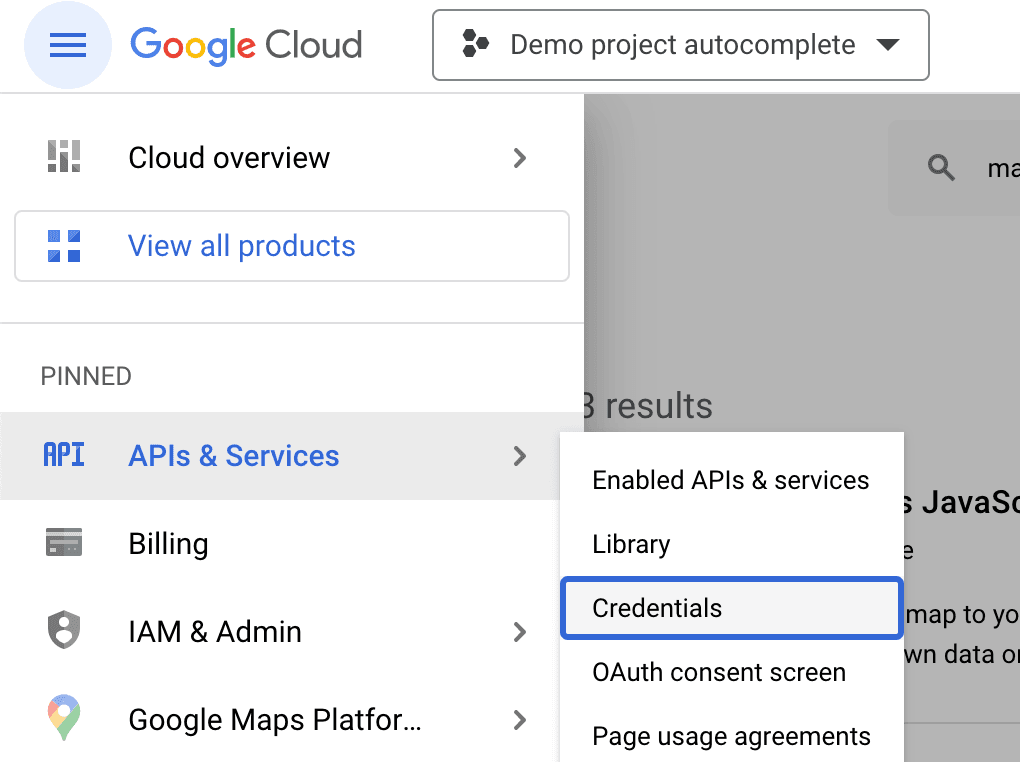
3. Set up a restricted access token
Go to APIs & Services > Credentials
You might have an access token already there, created when you enabled the APIs. If so, you can open it to edit it. Otherwise, you can create a new one.
Under “Set an application restriction”, select Website and then configure the domains that you’re expecting to use. You can always modify this later if you don’t know yet.
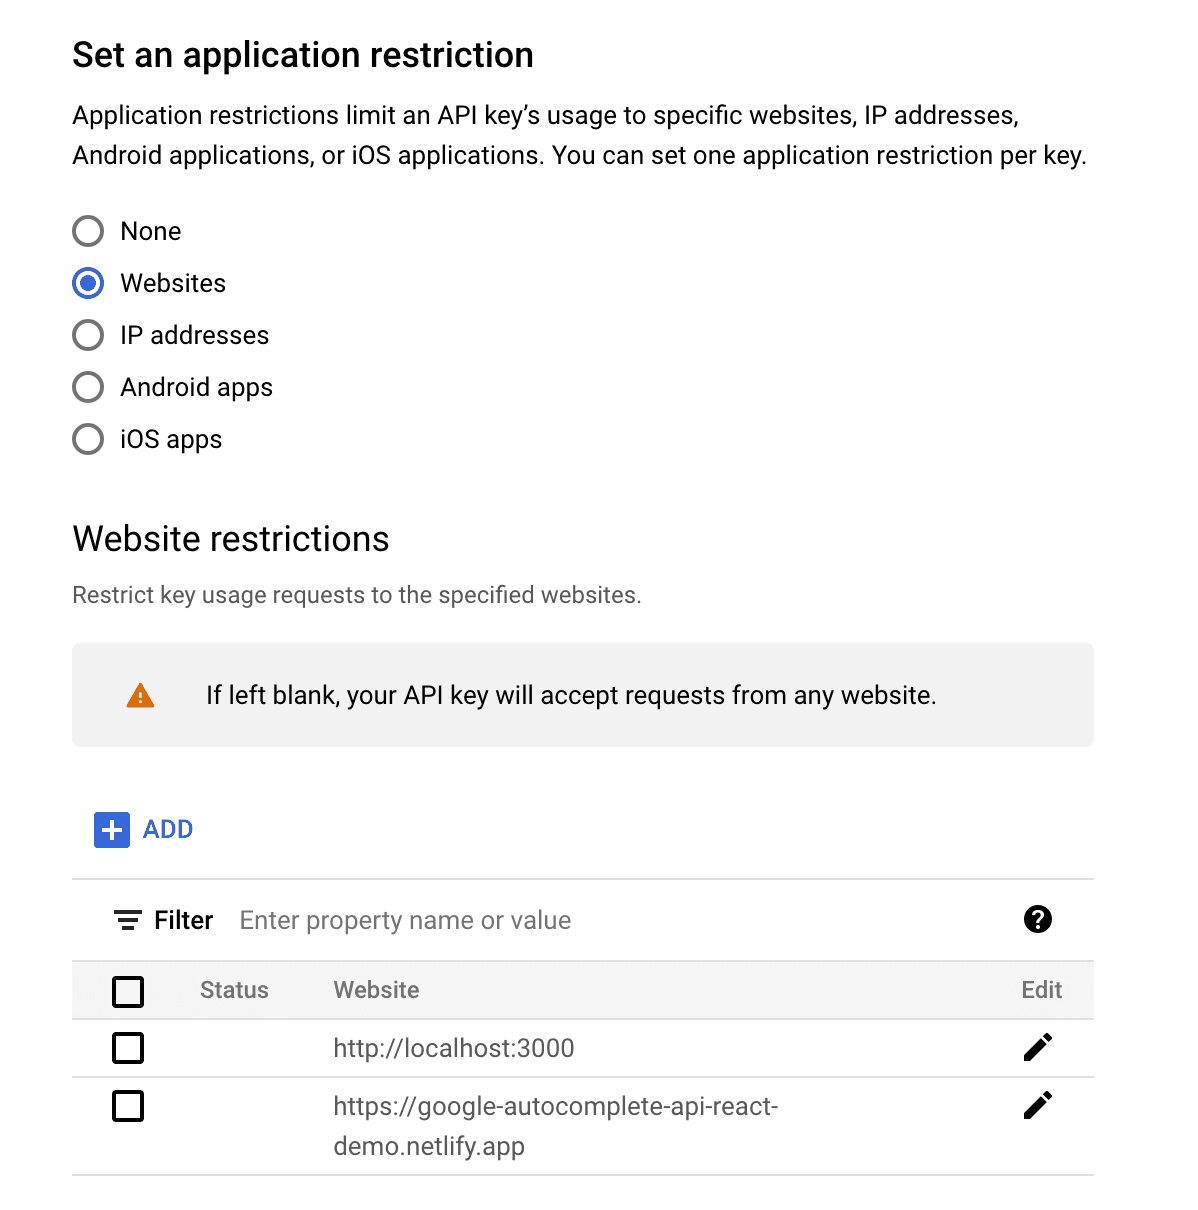
Remember that you can use asterisks for wildcards, and that you should have a different access token for each environment (local dev, staging, production). For the sake of my example, since it’s a demo project, I only did one token.
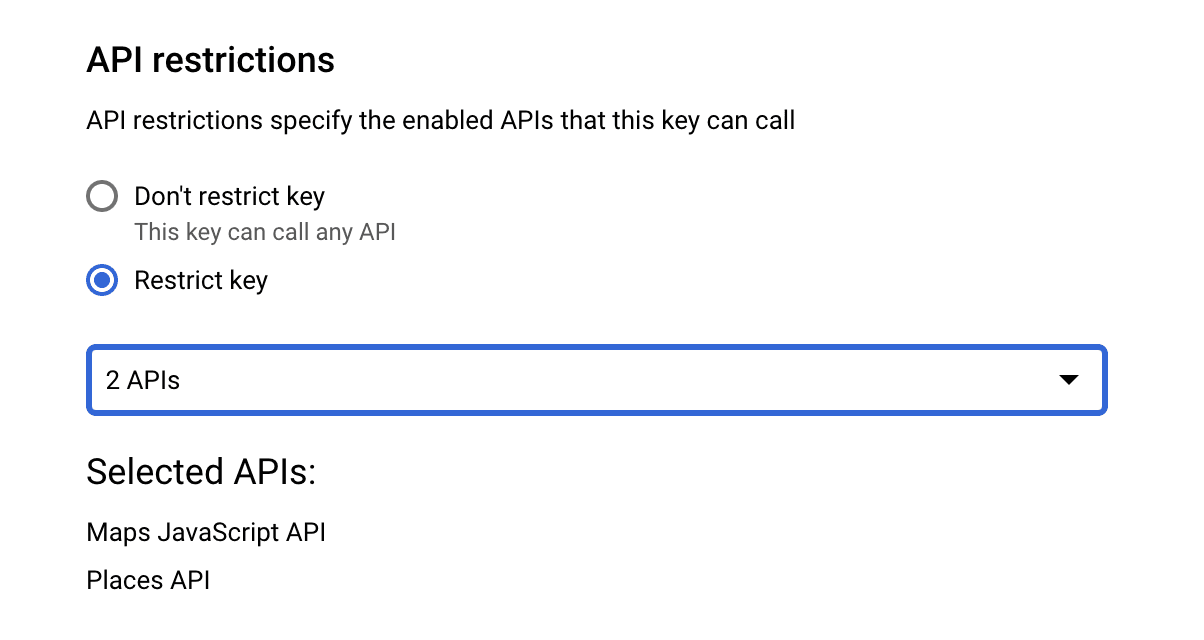
Also, restrict the key to use only the Maps JavaScript API and the Places API.
4. Copy the access token to your React project
Copy the API key value, and paste it in the environment of your React project. How you do it depends on your setup or framework.
5. Create the React component
An autofill input is just an input with a popover showing suggestions. If you’re lucky that the UI library you’re using has it included out of the box (e.g., Material UI Autocomplete), great! If not, then you’ll have to make it yourself.
The structure of the component would be as follows.
function LocationInput({
  value,
  onChange,
  onLocationSelected,
}) {
  const [suggestions, setSuggestions] = useState([]);
  const [placeDetail, setPlaceDetail] = useState();

  const loadSuggestions = async (inputValue) => {
    // ... see step 7
  };

  const handleSuggestionSelected = async (suggestion) => {
    // ... see step 8
  };

  // the JSX implementation will vary depending on which UI lib you're using
  return (
    <>
      <Input
        value={value}
        onChange={(event) => {
          const newValue = event.target.value;

          // update controlled input value
          onChange(newValue);

          // clear any previously loaded place details
          setPlaceDetail(undefined);

          // trigger the load of suggestions
          loadSuggestions(newValue);
        })
      />
      <Suggestions
        suggestions={suggestions}
        onSuggestionSelected={handleSuggestionSelected}
      />

      {/* The Places API requires a node to put attribution details */
      <div id='googlemaps-attribution-container'></div>
    </>
  );
}
6. Dynamically load the Maps JavaScript API as a package
Let’s use the official package @googlemaps/js-api-loader
npm i @googlemaps/js-api-loader
If you’re using TypeScript, you also want to install the official types:
npm i -D @types/google.maps
Create a lib file:
// lib/googleApiClient.js

import { Loader } from '@googlemaps/js-api-loader';

/**
 * This is a wrapper around the Google Maps API client.
 * see https://developers.google.com/maps/documentation/javascript
 */

/** @var {google.maps.PlacesLibrary|undefined} */
let placesApiClient;

export default async function getGoogleMapsPlacesApiClient() {
  if (placesApiClient) {
    return placesApiClient;
  }

  const loader = new Loader({
    apiKey: process.env.GOOGLE_MAPS_JAVASCRIPT_API_KEY,
    version: 'weekly',
  });

  placesApiClient = await loader.importLibrary('places');

  return placesApiClient;
}For more details, see the docs on Loading the Maps JavaScript API.
7. Use the Autocomplete Service to obtain suggestions
Let’s go now to implement loadSuggestions:
// let's add a timeout ref here, so we can debounce the calls
const timeoutRef = useRef();

// session token is a string to group autocomplete service requests with get place detail requests
// it's for billing purposes. See the docs: https://developers.google.com/maps/documentation/places/web-service/session-tokens
const sessionTokenRef = useRef();

const loadSuggestions = async (inputValue) => {
  clearTimeout(timeoutRef.current);

  // don't load suggestions if not enough characters
  if (!inputValue || inputValue.trim().length <= 3) {
    setSuggestions([]);
    return;
  }

  // debounce the loading of suggestions to reduce usage of the Google API
  timeoutRef.current = setTimeout(async () => {
    const places = await getGoogleMapsPlacesApiClient();
    if (!sessionTokenRef.current) {
      sessionTokenRef.current = new places.AutocompleteSessionToken();
    }

    // @see https://developers.google.com/maps/documentation/javascript/place-autocomplete
    new places.AutocompleteService().getPlacePredictions(
      {
        input: inputValue,
        sessionToken: sessionTokenRef.current,
      },
      (predictions, status) => {
        // when the status is 'ZERO_RESULTS', we treat it as if there are 0 suggestions, no error
        // you could change this behavior if you require users to pick a suggestion
        if (status === places.PlacesServiceStatus.ZERO_RESULTS) {
          setSuggestions([]);
          return;
        }
        if (
          status !== places.PlacesServiceStatus.OK ||
          !predictions
        ) {
          // if you allow your users to enter arbitrary locations that aren't autocompleted,
          // then you can fail silently here and track the error (with Sentry for example)
          return;
        }
        setSuggestions(predictions);
      },
    );
  }, 350);
};
8. Use the Place Details Service to obtain information about the selected suggestion
const handleSuggestionSelected = async (suggestion) => {
  // update the text in the input to the full selected suggestion text
  onChange(suggestion.description);

  // clear suggestion list
  setSuggestions([]);

  const places = await getGoogleMapsPlacesApiClient();

  // Clear the session token, it can only be used in one request
  const sessionToken = sessionTokenRef.current;
  sessionTokenRef.current = undefined;

  // @see https://developers.google.com/maps/documentation/javascript/places
  new places.PlacesService(
    // this is the node to populate attribution details on
    document.getElementById("googlemaps-attribution-container")
  ).getDetails(
    {
      placeId: suggestion.place_id,
      fields: [
        // you can pick the fields you want for your application
        // @see https://developers.google.com/maps/documentation/javascript/place-data-fields
        "formatted_address",
        "name",
        "geometry.location",
        "place_id",
      ],
      // pass the session token so all autocomplete requests are counted as part of this places request
      sessionToken,
    },
    (place, status) => {
      if (status === places.PlacesServiceStatus.OK) {
        // set the place detail in this state component
        // you can use this info to show the detail in the UI, or maybe a checkmark
        setPlaceDetail(place);

        // notify up the tree that a location is selected
        onLocationSelected(place);
      } else {
        // silently fail here and track it with an error tracker like Sentry
        // or fail loudly if users are required to use a suggestion from the list
      }
    }
  );
};
And voilà, you’ve done it!
Your input should show a list of suggestions and enable you to select one!
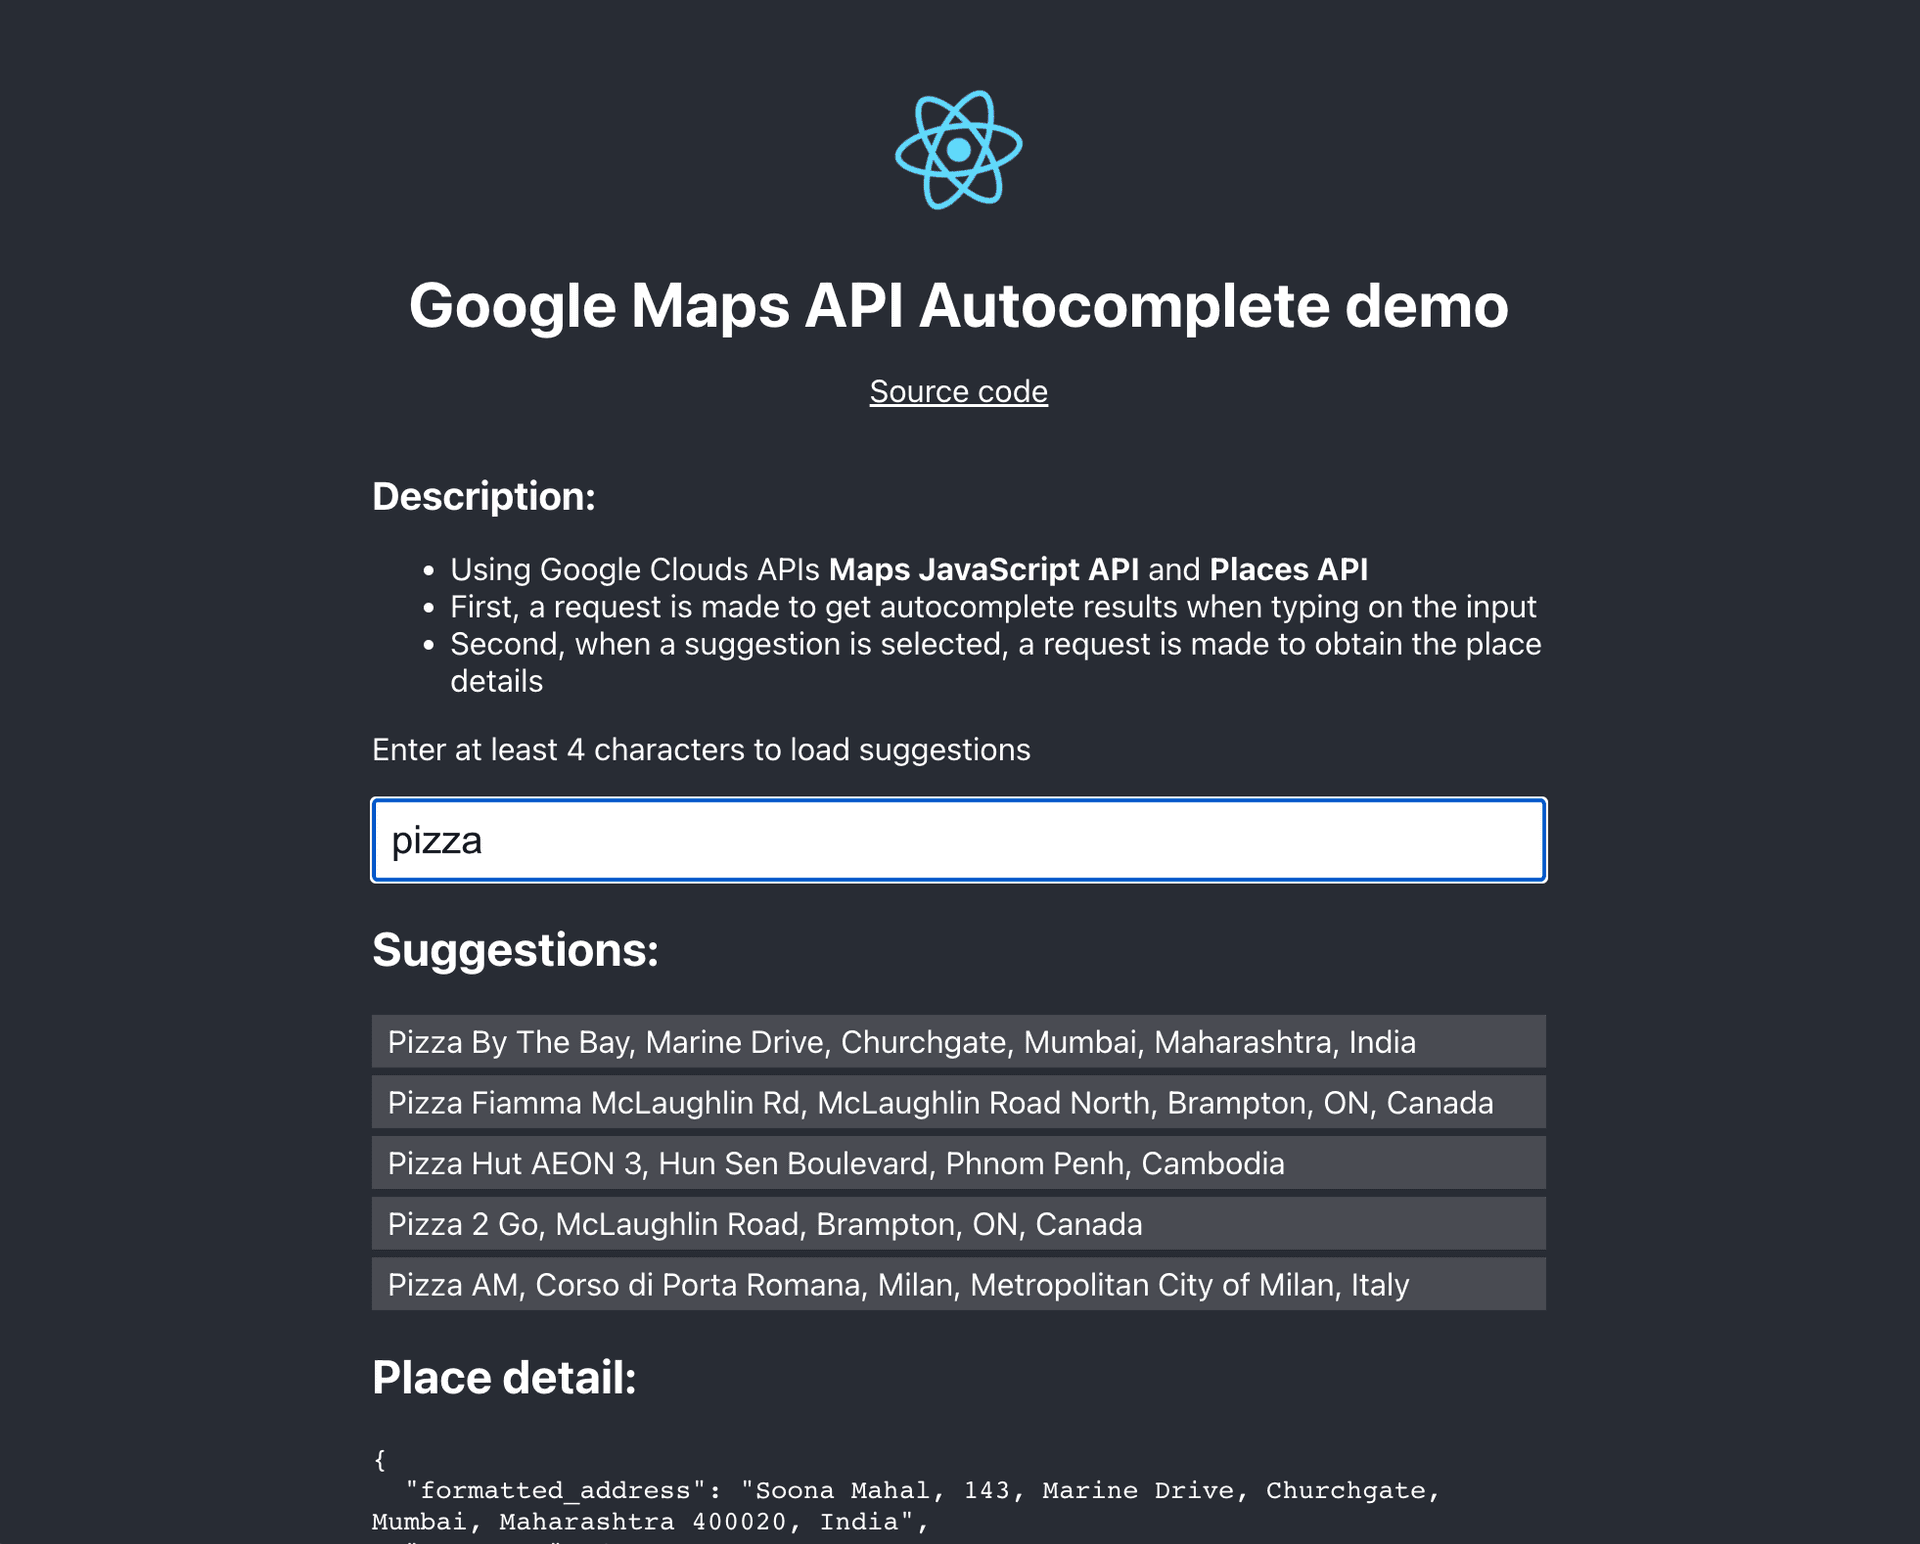
Live demo
Here’s a live demo of the simplest implementation, not using any UI library and started from Create React App.
https://google-autocomplete-api-react-demo.netlify.app/
Here’s the TypeScript source code with a couple of extra things: https://github.com/guillermodlpa/google-autocomplete-api-react-demo
Bonus: save the Place ID to make links to Google Maps totally accurate
If you’re using the location data to show a link to Google Maps, then save the place_id field. This will enable you to make a link that opens directly the place they selected. It’s more reliable than a URL to Google Maps with only query.
<a
  href={`https://www.google.com/maps/search/?api=1&query_place_id=${encodeURIComponent(place_id)}&query=${encodeURIComponent(`${name}, ${formatted_address}`)}`}
/>
	{`Link to place in Google Maps`}
</a>
Example:
For more info, see the documentation on Google Maps URLs.