An elegant pattern to implement Authorization checks in React
Development
Authorization is one of the most basic parts of any application, both role-based and permission-based. All applications with users need to perform those checks. Given that it’s always the same, one would imagine that there would be very few conventions to implement them, but that isn’t the case. In every organization I’ve worked, these checks were implemented differently in the frontend. I’ve seen over-engineered and oversimplified implementations, often with duplicated conditionals all over the codebase.
That’s why now I use the same pattern in all projects, one that is modular, plug-and-play and consistent across the codebase. Check it out below.
Authorization checks are part of Developer Experience
No matter if you work solo, in a team or a large organization, developers are all required to implement authorization checks. That’s why, like logging, it should be standardized (but kept simple!).
Whatever authorization patterns your frontend codebase uses, they should be plug-and-play. The simpler they are to use, the less edge cases developers will find, the less code to test, and the less maintenance required in the long term.
The almost-best approach of Bulletproof React 🛡️ ⚛️
When I discovered Bulletproof React, an architecture for React apps by Alan Alickovic, thanks to the React Status newsletter issue of July 2021, I knew I had found something tremendously useful. It was clear, prescriptive and supported by the community. That’s what I needed to concern myself less with how to organize a codebase and focus more on creating value.
However, I think their authorization guidelines aren’t as locked down and plug-and-play as it should be for working in a team or reusing checks across views. They would require some changes or additional abstractions.
The Ideal Developer Experience
What tools do React developers have to add plug-and-play logic in the views? Components and hooks. Our convention should include them with a standard naming and API.
The important things are, compared to the Bulletproof React guidelines:
That there’s a component and a hook for each check we want to do so we have smooth TypeScript autocompletion on inputs.
That they hide implementation details. That way, they can be reused across different views, and multiple developers can work over the same codebase without accidentally ending up with different authorization implementations for the same access control.
Role-based access control examples
React component
Let’s imagine a hypothetical view that lists all organized trips and shows a button to create a new one. We’d use a plug-and-play authorization component like this:
// components/TripList.tsx

import { CanCreateTripAuthorization } from 'lib/authorization/createTrip';

export default function TripList({ trips }: { trips: Trip[] }) {
  return (
    <div>
      {trips.map((trip) => <Trip trip={trip} key={trip.id} />}

      <CanCreateTripsAuthorization>
        <Button>Create Trip</Button>
      </CanCreateTripsAuthorization>
    </div>
  );
}
The component reads the information it needs from the application global state, the context, or by making the necessary API calls. For the side of your brain building the product views, those should be low importance implementation details.
React hook
Let’s say the design requirements change, and when a user doesn’t have access, we want to still show the button but disabled and some informative text next to it. Then, the easiest thing would be to use the hook:
// components/TripsList.tsx

import { useCanCreateTrip } from 'lib/authorization/createTrip';

export default function TripsList({ trips }: { trips: Trip[] }) {
  const { canAccess: canCreateTrip } = useCanCreateTrip();
  return (
    <div>
      {trips.map((trip) => <Trip {...trip} />}

      <Button isDisabled={!canCreateTrip}>Create Trip</Button>

      {!canCreateTrip && (
        <p>To create trips, you need to be in the "Organizer" plan.</p>
      )}
    </div>
  );
}
Permission-based access control examples
React component
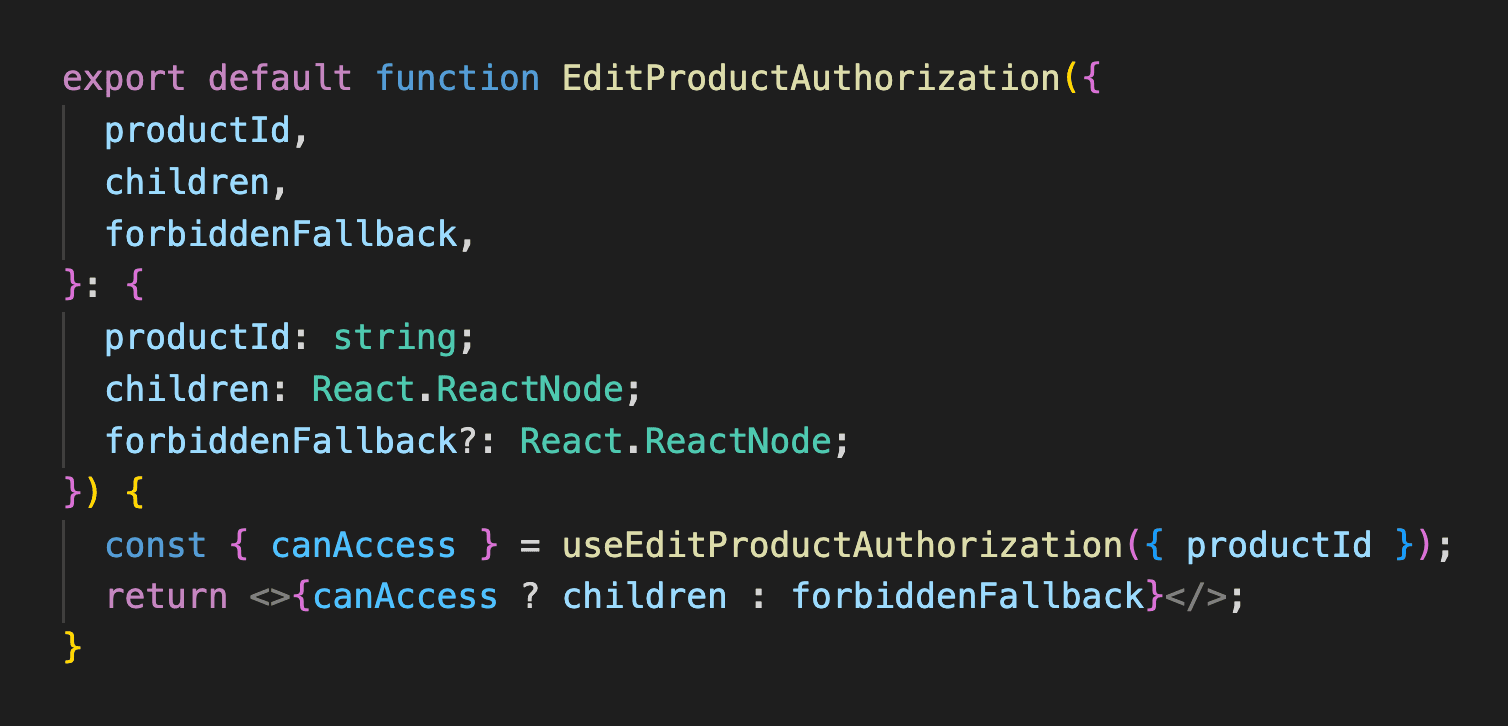
Imagine now that we’re checking if a user can edit a particular organized trip. In that case, we’d need to pass the trip identifier as an input:
// components/TripCard.tsx

import { CanEditTripAuthorization } from 'lib/authorization/editTrip';

export default function TripCard({ trip }: { trip: Trip }) {
  return (
    <div>
      {/* ... */}
      <CanEditTripAuthorization tripId={trip.id}>
        <Button>Edit Trip</Button>
      </CanEditTripAuthorization>
    </div>
  );
}
React hook
Similarly to the component form, we’d pass the necessary identifiers if this was a resource-access check:
// components/TripCard.tsx

import { useCanEditTrip } from 'lib/authorization/editTrip';

export default function TripCard({ trip }: { trip: Trip }) {
  const { canAccess: canEditTrip } = useCanEditTrip({ id: trip.id });
  return (
    <div>
      {/* ... */}
      <Button isDisabled={!canEditTrip}>Edit Trip</Button>
    </div>
  );
}
When asynchronous requests are required
The examples above assume synchronous access checks, when the data is already loaded. We can expand the pattern to account for asynchronous checks.
In that case, we’ll want to return more information so that the view can display loading and error states when appropriate.
Here’s the same hook as above but with asynchronous state variables returned:
// components/TripsList.tsx

import { useCanEditTrip } from 'lib/authorization/editTrip';

export default function TripsList({ trips }: { trips: Trip[] }) {
  const {
    canAccess: canEditTrip,
    loading,
    error,
  } = useCanEditTrip();

  return (
    <div>
      {/* ... */}
      {!loading && <Button isDisabled={!canEditTrip}>Edit Trip</Button>}
      {error && <p>Error. Try again later</p>
    </div>
  );
}
Using the “check” function directly
There are situations in which a plain function receiving all inputs is useful, like when calling it from the server side or wanting to combine different permissions in one.
Here’s an example of a Next.js page preventing the user from viewing it when they don’t have the permission:
// pages/createTrip.tsx

import { checkCanCreateTrip } from 'lib/authorization/createTrip';

export default function CreateOrganizedTripPage() {
  return ...
}

export const getServerSideProps: GetServerSideProps = async context => {
  const accessToken = await getAccessToken(context);
  const user = await fetchUser(accessToken);

  // check function called with inputs
  const canCreateTrip = checkCanCreateTrip({
    plan: user.plan,
  });

  if (!canCreateTrip) {
    return { notFound: true };
  }

  return { props: {} };
}
Example of an authorization file implementation
Here’s a hypothetical example that assumes all user data is already loaded in the application’s global state and accessible via useUser
// lib/authorization/canCreateTrip.ts

// Function with logic
export function checkCanCreateTrip({ plan }: { plan: UserPlan | null }) {
  return plan === UserPlan.ORGANIZER;
}

// Hook
export const useCanCreateTrip = () => {
  // Obtain inputs and call the logic
  // If we need to make API calls, we'd need to return `undefined`
  // until we have the data
  const { plan } = useUser();
  const canAccess = checkCanCreateTrip({ plan });
  return { canAccess };
};

// Component
export default function CanCreateTripAuthorization({
  children,
  unauthorizedFallback = null,
}: {
  children: React.ReactNode;
  forbiddenFallback?: React.ReactNode;
}) {
  // The component simply uses the hook, and provides
// an optional prop for rendering an error message when not allowed
  const { canAccess } = useCanCreateTrip();
  return canAccess ? children : forbiddenFallback;
}
If the permission check included an API call, or we used React Query to obtain the user data, we could make the hook return more information. Here’s an example of a authorization implementation with an asynchronous check, using Vercel SWR:
Not forgetting about authorization in the backend
Authorization in the frontend is more for giving the users a great experience than for security. For example, we hide links that users can’t visit or display more controls when users are admins. But authorization must be implemented in the backend, with proper role-based and permission-based checks when accessing resources. This applies to APIs you build and backend-less platforms like Firebase or Supabase. Don’t forget to add the proper access checks!
Summary: Implementing authorization in React
Inside the folder lib/authorization, each file should be named with a permission name, permission.tsx
Each file includes:
A
checkPermissionfunction receiving all necessary inputs in an object and returning a boolean.
A
usePermissionReact hook, without parameters except for the resource identifier for a permission-based control check, and it returns the result of callingcheckPermission.
A
PermissionAuthorizationReact component that uses the hook’s output and renders the children only when the result istrue.